On my other blog, I did a trip recap describing our 120+ mile trip along the C&O Canal Towpath. On that post, I mostly told the story of our trip while overlooking a major component of our trip, the gear.
Gear talk might not be for everyone, but for some people it is EVERYTHING. I like gear, and so I thought this would be a useful exercise for me to discuss what we used, what worked, what didn't, and what we'd like to improve for next time.
Major gear categories include (but not limited to):
- Bikes
- Bags
- Camp life
- Electronics
Bikes
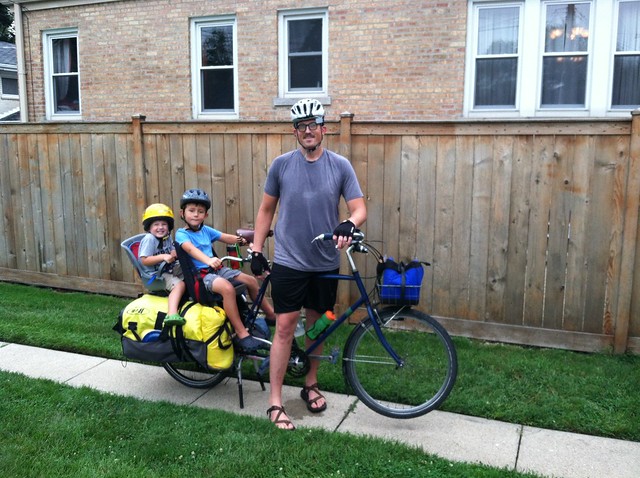
Our family of five made the trip on two bikes. Well, two and a half if you count the tagalong as half a bike. Each time we do a trip our gear slightly evolves so it's worth looking at and discussing what works.My Bike
My bike is an Xtracycle, or more accurately, a late 80's-early 90's Giant Chinook mountain bike with the Xtracycle "Free Radical" conversion kit.Other things to note is that this build includes Xtracycle brand "wide loaders", fenders/top tube bag and lights by Planet Bike, and a capable Soma Porteur front rack.

I made some improvements on this bike from last time around. On previous tours, I had a simple Wald basket mounted to a Nitto M-12 front rack. That is a pretty decent set up for city commuting and errands, but as far as real loaded touring, I like the porteur rack a lot more. In addition to being able to hold front panniers, it also made a great platform for an additional waterproof bag, or pizza when duty called. To be able to load the front of the bike up, made it handle a lot more predictably. It was considerably more stable and comfortable, especially when loading. In previous iterations, I felt like my bike would be prone to topple especially while loading.
In addition to the front rack upgrade, I also added a Lunch Box bag from Planet Bike. I love this bag. It can easily hold my iPhone 6, wallet, keys, and a couple of energy bars. It made for a convenient place to stash my phone when the rain came. Just wrapped it in a plastic bag and voila, worry free.
Two other small changes from previous trips - I upped my water capacity a whole bottle by using this handy dandy little guy from Topeak. You can see I utilized the free space in the rear triangle of my bike (where the back tire usually is) for the extra water bottle. When you are touring, you really can never have enough water.
Also, I changed my pedals. I had been using some cheapo plastic platform pedals that worked ok, but I treated myself to the highly regarded MKS Grip Kings. These are lovely pedals, and give you ample room for foot support which is especially nice for bigger footed individuals. They also pair nicely with my favorite bike touring footwear, Chacos Z2's.
M' Lady's Bike
Ashley's bike is a pretty standard Trek Mountain track, late 90's to early 2000's from my estimation. We changed up a few things on her bike from previous rounds, in addition to the awesome Burley Kazoo.
We also changed the saddle. Sadly, she was riding on a vintage saddle from an old Specialized Hard Rock. I know, I'm a horrible husband. So while I was in the market for a saddle, I got some excellent advice from the folks at Planet Bike and they recommended I try the ARS Standard. It is a significant improvement. I've even tried it out and found it to be quite comfortable. Highly recommend.
Ashley's set up remained mostly unchanged, although I also added mud flaps (again, from Planet Bike) onto her Full ATB ones. This dramatically improved the fender coverage which made a HUGE DIFFERENCE due to the heavy mud we encountered during the trip. Again, Planet Bike to the rescue.
Another big change for us this trip, was having a child who could possibly bike some or all of the distance. Unwilling to completely let go of the reigns, the next best option was for us to get a tag-a-long, or trail-a-bike, or bike-trailer. There are many phrases for this contraption.
The Burley Kazoo (and Piccolo) are far superior to nearly every other competitor out there for several reasons.
1. Weight
From first hand experience and the testimonials of others. It is lighter to pull.
2. Connection to bike
Unike every other tagalong, the Burley system uses a rack that you attach to your bike, and then the trailer part attaches to the rack. The genius lies in the double/hitch system. This drastically improves the handling of the bike and means that whatever your kid is doing "back there" doesn't adversely affect how your bike handles. In other systems, the trailer part hooks directly to the seat post, and when your child shifts their weight, you feel it! The rack itself is nice, and allows you to still mount panniers (see above picture) to your bike while pulling the Kazoo.
3. Versatility
What I love love love about the Burleys, is that they have braze-ons so you can mount racks and fenders to them. This allowed us to transform a typical trail a bike into a rugged touring machine! I had to modify my Planet Bike Eco Rack a smidge, but it was very simple and I was really pleased with the results. I used a 20" recumbent fender from Planet Bike and it fit perfectly!

Bags
Bags were a big part of the trip. After all, they carry all of your stuff and have to work with your bikes. Starting from top left, working clockwise:
1. Vintage Cannondale panniers.
These little fellers are pretty funny. We used them on the Burley, and their mount system uses traditional hooks (that hook on the top rail of your rack) and then secure themselves with this antiquated (yet effective) spring and hoop system. You really have to see it to believe it. They are made out of a pretty durable nylon/synthetic, and in addition to having one main compartment have a ton of pockets on them. I got them used on the local bike-scene website here in Chicago for $30. Totally worth it. We put stuff in here that could get wet.
2. Ortlieb Back Rollers
These really are the classic pannier. Best mounting system I've seen. Waterproof. Durable and strong. There's really not a lot you can add to that. I've had these panniers for probably seven years or so and can see them lasting another seven easy. They aren't cheap, but they are worth the price. These panniers held all our boys clothes, and a lot of food and medical supplies.
3. RE Load Messenger Bag
Back when I knew nothing about bikes I used to use a messenger bag. I got this one made from Philadelphia based RE Load. It is a great bag. Waterproof and tough, but now I never use it for bike trips, but it's my go-to for traveling (great carry on) and it was perfect for holding a bunch of our sleeping bags, pillows, and pads.
4. SealLine Urban BackPack
This is a great little waterproof back pack that I have, that I just don't use. It worked great as a front bag on top of my porteur rack, and ultimately became a platform for my
5. Bob Dry Sak (sic).
This bag came with my Bob Yak (another retired piece of bike touring gear). It is a great bag. Super tough and waterproof. We hauled our tent and other sleeping bags/pads in this. Very nice to have.
6. Carsick Designs Front Panniers
This is a lovely story. Maybe about two years ago I saw these beautiful panniers on someone's blog. Tried to remember the name. Then planning for this tour a year ago, I was on the hunt for front panniers that were compatible with my Soma Rack. Given it's weird geometry, I was a little reluctant to purchase ANY pannier. I then got it in my brain that perhaps a camoflauge pannier would look cool. Did a little digging and voila, found this great little shop in California that makes hand-made bike touring gear that also makes sweet camo gear. After crosschecking, I realized that this company was the same maker that I saw over two years ago. Carsick Designs was super nice to work with. They even sent me out a prototype so I could test the panniers with my rack. How awesome is that? These panniers are highly water resistant and excellent quality. Withstood high amounts of rain and kept our clothes dry. I will be buying another pair before our next tour.
Camplife
The major change to our camping arrangement this year was a new tent. Our previous tent was a three man tent. Light and capable, we had simply out grown it with the advent of our third child.
Nothing but glowing reviews for this tent. Even at it's most economy level, Big Agnes really delivers. The tent poles are sturdy (yet not heavy), and all the zippers and material feels quality. We've been stuck in two significant downpours and were kept bone dry. I'm 6'4" and could stand up straight, and still had room over my head. I've never had that kind of head clearance before. A 6 man tent might get a little close for comfort when my three boys are all teenagers, but for now, this will suit our family just fine.

Side shot of the tent. Doesn't do it justice but it's wonderful.
The other thing I liked about this tent is the duffle-bag system to which it packs into. It essentially opens up like a wallet. One side goes the tent. The other side goes the fly. In the middle, is a separate pouch for poles and stakes. Takes all the guess work (should I roll, fold, or stuff?) out of packing. Just jam it in there!
Electronics
There's just no getting around it these days. If you are going on a bike tour, electronics will play some part of it. Whether it's phones, GPS units, cameras, etc - managing your electronics will take some forethought if you want to navigate and document your trip.The electronics we were using were:
1. 2 Iphones 6's
2. GoPro Hero 3
3. Canon DSLR
I wasn't worried about my DSLR. I brought it so I could take some higher quality pictures. I don't regret bringing it, though I did lose it. It was later returned to me. Long story short - thank you good Samaritan! I was confident in it's battery lasting the duration of the trip.
I was worried about our phones, especially because (like a moron) I left my map at home by accident so much of our trip planning had to be done on the phone (where to eat, phone numbers, etc).
I was also worried about the battery on my GoPro, but less so because I bought a spare battery on amazon for $8. That was a good decision. That allowed me to document our trip without having to worry about battery life and recharging.
We took advantage of electricity every time we had it. Charging in both motels and mcdonald's alike. Though the last couple of days we started to run low on cell phone batter so I busted out the Solar Charger. I knew I was skimping on quality, considering similar spec'd models sell for nearly triple that at REI. But since this was my first step into the technology, I didn't want to go ALL-in just yet. My results weren't great with this. Granted, we were under a pretty heavy tree canopy and really needed it during a very over cast day. The most... generous review of this tech is that my phone had completely died, and on a very overcast day it restored my phone to about 5%. So - I'm going to use this on another trip of somekind before I write it off completely.
If you made it through all this, I salute you. Those are the major points and a good place to stop. If you have any questions please let me know!


